Add an additional database to your Sitecore instance
Sometimes we need to add a new database in our Sitecore instance, so let’s see how to do it
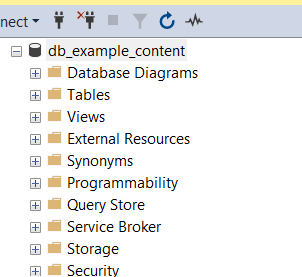
The very first step is to add an additional database to the SQL Server with the same DB schema as Sitecore web database
Then, add the custom connection string in your ConnectionString.config file in your Sitecore instance

In this example I’m gonna name this new custom db as “content”
Then, we need to add a patch file to activate the access to this new database in the instance
<configuration xmlns:patch="http://www.sitecore.net/xmlconfig/" xmlns:set="http://www.sitecore.net/xmlconfig/set/">
  <sitecore xmlns:role="http://www.sitecore.net/xmlconfig/role/">
    <databases>
      <database id="content" singleInstance="true" type="Sitecore.Data.DefaultDatabase, Sitecore.Kernel"
				role:require="Standalone or Reporting or Processing or ContentManagement or ContentDelivery">
        <param desc="name">$(id)</param>
        <icon>Office/32x32/data_scroll.png</icon>
        <dataProviders hint="list:AddDataProvider">
          <dataProvider ref="dataProviders/main" param1="$(id)">
            <prefetch hint="raw:AddPrefetch">
              <sc.include file="/App_Config/Prefetch/Common.config"/>
              <sc.include file="/App_Config/Prefetch/Master.config"/>
            </prefetch>
          </dataProvider>
        </dataProviders>
        <securityEnabled>true</securityEnabled>
        <publishVirtualItems>true</publishVirtualItems>
        <PropertyStore ref="PropertyStoreProvider/store[@name='$(id)']"/>
        <remoteEvents.EventQueue>
          <obj ref="eventing/eventQueueProvider/eventQueue[@name='$(id)']"/>
        </remoteEvents.EventQueue>
        <workflowProvider hint="defer" type="Sitecore.Workflows.Simple.WorkflowProvider, Sitecore.Kernel">
          <param desc="database">$(id)</param>
          <param desc="history store" ref="workflowHistoryStores/main" param1="$(id)"/>
        </workflowProvider>
        <archives hint="raw:AddArchive">
          <archive name="archive"/>
          <archive name="recyclebin"/>
        </archives>
        <NotificationProvider type="Sitecore.Data.DataProviders.$(database).$(database)NotificationProvider, Sitecore.Kernel">
          <param connectionStringName="$(id)">
          </param>
          <param desc="databaseName">$(id)</param>
        </NotificationProvider>
        <cacheSizes hint="setting">
          <data>100MB</data>
          <items>50MB</items>
          <paths>2500KB</paths>
          <itempaths>50MB</itempaths>
          <standardValues>2500KB</standardValues>
        </cacheSizes>
        <Engines.DataEngine.Commands.AddFromTemplatePrototype>
          <obj type="Sitecore.Buckets.Commands.AddFromTemplateCommand, Sitecore.Buckets"/>
        </Engines.DataEngine.Commands.AddFromTemplatePrototype>
      </database>
    </databases>
    <eventing defaultProvider="sitecore">
      <eventQueueProvider defaultEventQueue="core">
        <eventQueue name="content" type="Sitecore.Data.Eventing.$(database)EventQueue, Sitecore.Kernel">
          <param ref="dataApis/dataApi[@name='$(database)']" param1="$(name)"/>
          <param hint="" ref="PropertyStoreProvider/store[@name='$(name)']"/>
        </eventQueue>
      </eventQueueProvider>
    </eventing>

    <PropertyStoreProvider defaultStore="core">
      <store name="content" prefix="content" getValueWithoutPrefix="true" singleInstance="true"
				type="Sitecore.Data.Properties.$(database)PropertyStore, Sitecore.Kernel">
        <param ref="dataApis/dataApi[@name='$(database)']" param1="$(name)"/>
        <param resolve="true" type="Sitecore.Abstractions.BaseEventManager, Sitecore.Kernel"/>
        <param resolve="true" type="Sitecore.Abstractions.BaseCacheManager, Sitecore.Kernel"/>
      </store>
    </PropertyStoreProvider>
  </sitecore>
</configuration>
Of course, if we want to search inside this database in the content editor, we’ll add a new index in Solr.
We must create a new index in our Solr instance and with the following patch file we can set the crawler for this new database
<?xml version="1.0" encoding="utf-8" ?>
<configuration xmlns:patch="http://www.sitecore.net/xmlconfig/" xmlns:role="http://www.sitecore.net/xmlconfig/role/" xmlns:search="http://www.sitecore.net/xmlconfig/search/">
  <sitecore role:require="Standalone or ContentManagement or ContentDelivery" search:require="solr">
    <contentSearch>
      <configuration type="Sitecore.ContentSearch.ContentSearchConfiguration, Sitecore.ContentSearch">
        <indexes hint="list:AddIndex">
          <!--$(ResourceIndexEnvironmentPrefix): ??-->
          <index id="hyland_content_index" type="Sitecore.ContentSearch.SolrProvider.SolrSearchIndex, Sitecore.ContentSearch.SolrProvider">
            <param desc="name">$(id)</param>
            <param desc="core">$(id)</param>
            <!-- This initializes index property store. Id has to be set to the index id -->
            <param desc="propertyStore" ref="contentSearch/indexConfigurations/databasePropertyStore" param1="$(id)" />

            <configuration ref="contentSearch/indexConfigurations/defaultSolrIndexConfiguration" >
              <documentOptions type="Sitecore.ContentSearch.SolrProvider.SolrDocumentBuilderOptions, Sitecore.ContentSearch.SolrProvider">
                <indexAllFields>true</indexAllFields>
              </documentOptions>
            </configuration>

            <strategies hint="list:AddStrategy">
              <!-- NOTE: order of these is controls the execution order -->
              <strategy ref="contentSearch/indexConfigurations/indexUpdateStrategies/onPublishEndAsync" />
            </strategies>

            <locations hint="list:AddCrawler">
              <crawler type="Sitecore.ContentSearch.SitecoreItemCrawler, Sitecore.ContentSearch">
                <Database>content</Database>
                <Root>/sitecore</Root>
              </crawler>
            </locations>
          </index>
        </indexes>
      </configuration>
    </contentSearch>
  </sitecore>
</configuration>
Finally, re-start the Sitecore instance and check if your new database is accessible
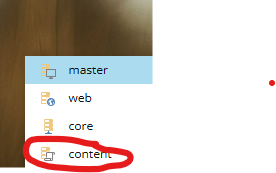
Select the database and open the content editor and that is it.
Happy coding 😀